Table of contents
Jest timers and ReactJs - How to use jest time-related functions
The content here is under the Attribution 4.0 International (CC BY 4.0) license
Join Our Community
Connect with developers, architects, and tech leads who share your passion for quality software development. Discuss TDD, architecture, software engineering, and more.
→ Join SlackTLDR
This post explores the possibilities of using fake timers with jest. Such a feature is needed for async testing, whereas is needed to wait for some computation to finish. Such computation can vary in time, for example, 1 second, or 10 minutes. In a test case scenario, the waiting for this computation is not needed. Jest offers fake times, to advance in time or run pending computations without the need to wait for them to complete. Jest is not used in ReactJs projects only, therefore, the examples used here use ReactJs as a library to build web interfaces. For pure NodeJs examples with times, it is recommended to go to the official documentation.
Introduction
This post explores the possibilities of using fake timers with jest. Such a feature is needed for async testing, whereas is needed to wait for some computation to finish. Such computation can vary in time, for example, 1 second, or 10 minutes. In a test case scenario, waiting for this computation is not needed (Jest, 2021) and is not desirable. Such variability can make the test not deterministic, resulting in a degraded experience for long-term usage of the test suite.
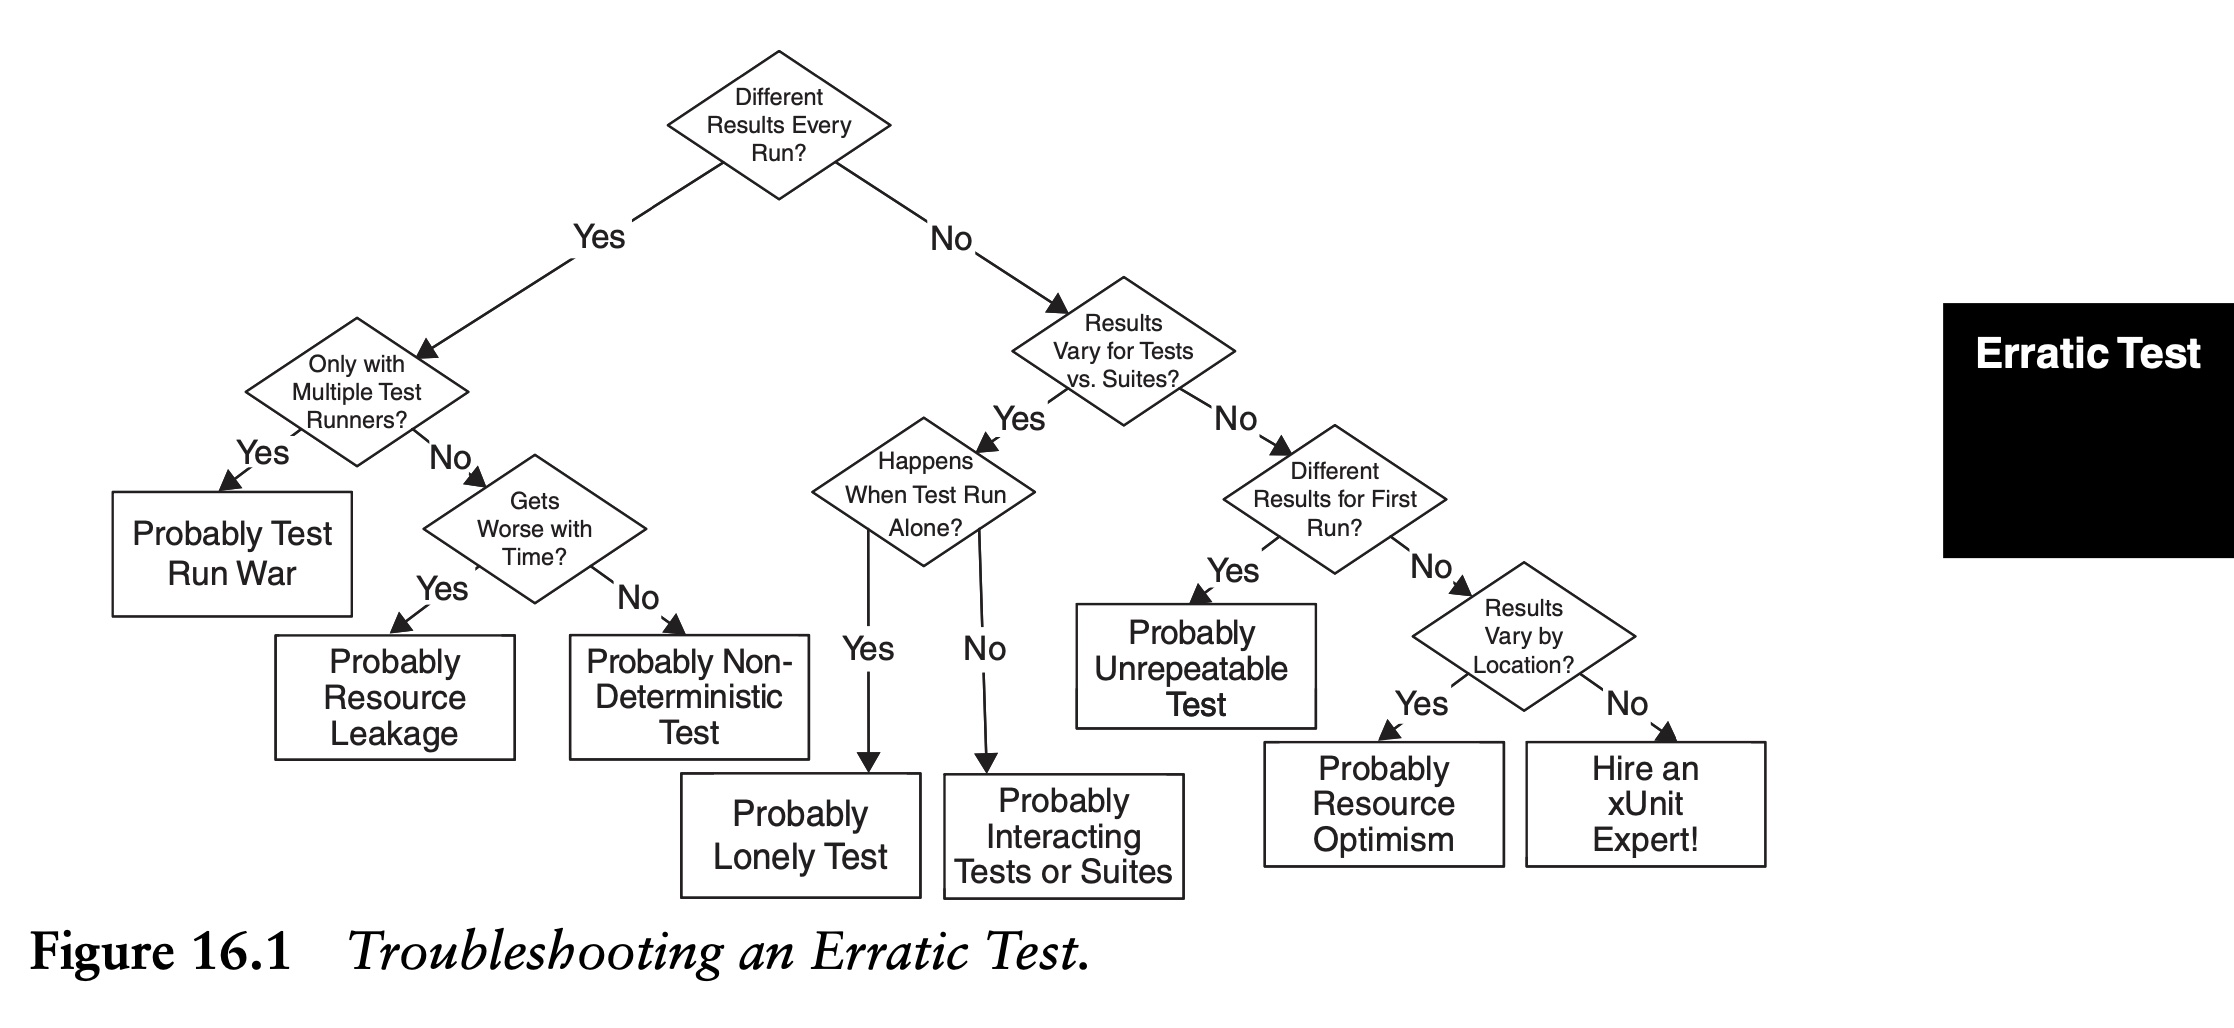
Erratic test
Meszaros categorized such behavior as a test smell and named it the “Erratic test”. The symptoms appear when the test starts to pass under some circumstances and to fail under others. As a result, the confidence of the test suite becomes low and the intermittent pass/fail becomes familiar to the people who are maintaining the code bases. This is problematic. The alternative offered by Meszaros is to start with a data-first approach (Meszaros, 2007). The following figure was taken from his book xUnit Patterns with a flowchart on how to mitigate this problem:
In the NodeJs/Javascript ecosystem, Jest offers fake times, to advance in time or run pending computations without the need to wait for them to complete. It allows the person who is developing the application to control how time behaves. It is like a time machine through code.
Jest is used in different kinds of applications, including client-side and server-side applications. However, the examples used here use ReactJs as a library to build web interfaces. Such interfaces require time-based code for a variety of use cases such as enabling animations and controlling user interaction. For pure NodeJs examples with timers, it is recommended to go to the official documentation (Jest, 2021).
The theory of controlling time to execute tests is not exclusive to NodeJs/Javascript. Dave Farley in his webinar about acceptance testing also recommends this approach for controlling time variables (Farley, 2021), Farley shows code examples in Java, which spot this idea of controlling time across programming languages.
NOTE: This post assumes testing knowledge with Jest
Jest official documentation offers a section that goes through the first steps to use Jest. From the installation process to mocking code.
Context
The react component used in this post is a component that displays different content based on the props given, and also, it uses animation to introduce them. As such, the animation takes time to finish and to complete its life cycle. Jest timers are used to avoid the need to delay the test suite execution. The following ReatJs component uses the function setTimeout and waits for the number of milliseconds desired that are injected via props, if none is given, it will wait 2000 by default.
import { useState } from 'react';
import Button from '../../buttons/primary/Primary';
import AnimatedText, { TextItem } from '../text-keyboard-animation/AnimatedText';
import { BuggyLeft, BuggyBug, BuggyHappy,  BuggyHappyLeft } from '../../images/buggy/Buggy';
import AlienSvg from '../../images/alien/AlienSvg';

import './scene.scss';

const RELEASE_BUTTON = 2000;

interface Props {
  onCompleted?: any,
  showAlien?: any,
  text: TextItem[],
  className?: string,
  next?: any,
  previous?: any,
  lastScene?: boolean,
  handleLastScene?: any,
  button?: string,
  releaseButton?: number,
  showNextButton?: number,
  step?: number,
  showBuggy?: any,
}

const Scene = ({
  onCompleted,
  showAlien,
  text,
  className,
  next,
  lastScene,
  handleLastScene,
  button,
  releaseButton,
  showNextButton: nextButton,
  showBuggy
}: Props) => {
  const [showNextButton, setShowNextButton] = useState(false);
  const [disableNextButton, setDisableNextButton] = useState(false);

  const onFinishedTyping = () => {
    setTimeout(() => setShowNextButton(true), nextButton);
  };

  const onClick = event => {
    if (disableNextButton) {
      return;
    }

    setDisableNextButton(true);

    setTimeout(() => {
      setDisableNextButton(false);
    }, releaseButton);

    if (lastScene) {
      handleLastScene();
      return;
    }

    next(event);
  };

  const classes = `
      scene
      flex
      flex-col
      py-10 px-10
      text-lg
      md:text-2xl
      text-white
      relative
      ${className}
    `;

  let alienClass = 'hidden';

  if (showAlien) {
    alienClass = 'md:block';
  }

  if (showAlien && showAlien.animate) {
    alienClass = 'md:block md:slide-in-bck-top';
  }

  let buggyClass = '';

  if (showBuggy.type) {
    buggyClass = 'md:block';
  }

  if (showBuggy.animate) {
    buggyClass += ' md:slide-in-bck-right';
  }

  return (
    <div className={classes}>
      <div className="flex">
        <AnimatedText
          className="w-2/3"
          text={text}
          onFinishedTyping={ onFinishedTyping }
        />

        <BuggyLeft className={`absolute pin-r w-1/3 mt-10 hidden ${buggyClass}`} />

        <BuggyLeft
          className={
            `absolute pin-r w-1/3 mt-10 hidden ${
              onCompleted.showBug && showNextButton ? 'md:block md:slide-in-bck-right' : 'hidden'
            }
          `} />

        <BuggyHappyLeft
          className={
            `w-3/3 absolute w-1/3 pin-r pin-t -mt-6 hidden ${
              onCompleted.type === 'happy' && showNextButton ? 'md:block md:slide-in-bck-right' : 'hidden'
            }`
          }
        />

        <AlienSvg className={
          `w-3/3 absolute w-1/3 pin-r pin-t -mt-6 hidden ${alienClass}`
        }/>

        {
          showBuggy.type === 'bug' &&
          <BuggyBug
            style=
            className={'w-3/3 absolute w-1/3 pin-r pin-t -mt-6 hidden md:block'}
          />
        }

        {
          showBuggy.type === 'happy' &&
          <BuggyHappy
            style=
            className={'w-3/3 absolute w-1/3 pin-r pin-t -mt-6 hidden md:block'}
          />
        }
      </div>

      {
        showNextButton &&
        <Button
          className="absolute pin-b mb-8 scale-in-center"
          description={button}
          onClick={onClick}
          disabled={disableNextButton}
        />
      }
    </div>
  );
};

Scene.defaultProps = {
  text: [],
  onCompleted: {},
  showBuggy: {},
  releaseButton: RELEASE_BUTTON,
  showNextButton: 900,
};

export default Scene;
Both source code and test code are available at GitHub for public inspection.
Fake times
The first step to using the fake timers is to have them set. There are two options to achieve that. The first one is
to call useFakeTimers. The second option is to set the function inside the beforeEach:
describe('my test suite', () => {
  beforeEach(() => {
    jest.useFakeTimers();
  })

  // test cases
})
The second option is the preferred one if the test suite has multiple tests that depend on the timer, as the official jest documentation says:
If running multiple tests inside of one file or describe block, jest.useFakeTimers() can be called before each test manually or with a setup function such as beforeEach. Not doing so will result in the internal usage counter not being reset.
On the other hand, the first approach has no way to reset the mocks set, to achieve that we would have to make use of the function afterAll from jest. All in all, the approach used for the post is the following:
describe('my test suite', () => {
  beforeEach(() => {
    jest.useFakeTimers()
  })

  afterEach(() => {
    jest.useRealTimers()
  })

  // test cases
})
Run all timers
import { mount } from 'enzyme'
import { act } from 'react-dom/test-utils'
import Scene from './Scene'

describe('Scene component', () => {

  beforeEach(() => {
    jest.useFakeTimers();
  })

  afterEach(() => {
    jest.useRealTimers();
  })

  test('should handle next scene', () => {
    const handleLastScene = jest.fn()
    const handleNextScene = jest.fn()

    const wrapper = mount(
      <Scene
        lastScene={false}
        handleLastScene={handleLastScene}
        next={handleNextScene}
        text={fakeText}
        showNextButton={1}           // Time in milliseconds to display the button
        releaseButton={1}            // TIme in milliseconds to enable the interaction with the button
      />
    )

    act(() => {
      jest.runAllTimers();           // Run all peding timers (setTimeout, setInterval, clearTimeout, clearInterval)
    })

    wrapper.update()
    wrapper.find(Button).simulate('click')

    expect(handleLastScene).toHaveBeenCalledTimes(0)
    expect(handleNextScene).toHaveBeenCalled()
  })
})
In the test case, the button depends on two specific timers, one for displaying the button and the other one to enable the interaction with the button again. The latter is to prevent calling the button events twice or even more times.
runAllTimers, as specified in the jest documentation, is desired to use when there are no recursive timers, otherwise,
runAllTimers will end up in an endless loop (Jest, 2021).
Advance timers by time
Another approach to use in the test case provided in the previous section
would be to use advanceTimersByTime. As long as the time provided by the
function is greater than the time passed in showNextButton, it should
work. For example:
// imports and describe have been removed, this snippet
// focus on jest.advanceTimersByTime only
test('should handle next scene', () => {
  const handleLastScene = jest.fn()
  const handleNextScene = jest.fn()

  const wrapper = mount(
    <Scene
      lastScene={false}
      handleLastScene={handleLastScene}
      next={handleNextScene}
      text={fakeText}
      showNextButton={1}
      releaseButton={1}
    />
  )

  act(() => {
    jest.advanceTimersByTime(2000);               // advance time by 2 seconds
  })

  wrapper.update()
  wrapper.find(Button).simulate('click')

  expect(handleLastScene).toHaveBeenCalledTimes(0)
  expect(handleNextScene).toHaveBeenCalled()
})
Using advanceTimersByTime advance all timers as well as recursive timers. Both
of the approaches depicted work without having to wait for the actual time
to pass, thus, the test suite runs as fast as it can and there is no
“real” delay.
References
- Jest. (2021). Timer Mocks. https://jestjs.io/docs/timer-mocks
- Meszaros, G. (2007). xUnit test patterns: Refactoring test code. Pearson Education.
- Farley, D. (2021). Acceptance Testing | Webinar. https://youtu.be/SuDIYk9GBpE?t=1828