Table of contents
Combining Vitest and Testing Library for Maximum Efficiency
The content here is under the Attribution 4.0 International (CC BY 4.0) license
TLDR
Vitest was born from VueJs ecosystem and rapidly started to evolve into other communities, such evolution, led to friction when migrating or even when trying to make tools to work together. In Jest, the testing library works automatically, not much effort needs to be done. On the other hand, trying to combine, the testing library and Vitest, might bring some challenges. The aim here is to go step-by-step to configure Vite and testing library in an environment that uses typescript.
Introduction
The javascript ecosystem provides a variety of tools and frameworks that sometimes require some configuration dancing to work together. Jest has been the dominating player for running javascript tests, it provides an end-to-end experience in regards to features, for example, you don’t need to configure a test runner and also the assertion library. Even though, such a thing is possible to do if needed.
Jest works across libraries and frameworks, React packs Jest automatically when creating a project using Create-React-App.
Besides, Jest also works with applications that are run on the server side. Such popularity was questioned by Vitest, an alternative to Jest, which is focused on speed. But of course, it will vary based on the context, I did some experimentation myself and this is the result of using Vitest with ReacJs:
Vitest was born from VueJs ecosystem and rapidly started to evolve into other communities, such evolution, leads to friction when migrating or even when trying to make tools to work together. In Jest, testing-library works automatically, not much effort needs to be made. On the other hand, trying to combine, the testing-library and Vitest might bring some challenges. The aim here is to go step-by-step to configure both of them in an environment that uses typescript.
Why testing library
If you are like me, the ideal test is the one that is not coupled with my production code allowing me to refactor and improve the code as much as I want without even worrying about the test. Opposed to testing-library, vue testing utils expose the internals of a component, and this scenario is depicted in the test file that comes with the project we just created.
describe('HelloWorld', () => {
  it('renders properly', () => {
    const wrapper = mount(HelloWorld, { props: { msg: 'Hello Vitest' } })
    expect(wrapper.text()).toContain('Hello Vitest')
  })
})
Anytime I change the props, to something else that is not msg I will have to update my test file, which is not desired, I haven’t changed any behavior to break my tests, such change should not be needed.
Testing-library allows the test to reflect what the user will do when interacting with the application, rather than focusing on component implementation such as props. It became popular within ReactJs ecosystem, but it was adopted by others as its benefits and philosophy support the evolution of applications as the one described.
The project
To start with, let’s create a project with create-vue, executing the following command should create a brand-new project:
npm create vue@3 create && \
  cd vitest-testing-library && \
  npm i
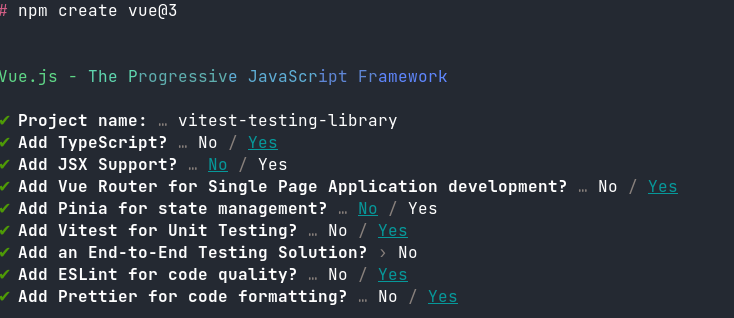
This command will issue an interactive terminal to fill in some relevant information for the project, the following options were used:

Using create-vue jumps a few steps in the way to configure VueSs and Vitest. Setting up Vitest in an already existing VueJs application requires a different approach. To make sure that the requirements are in place before moving to the next section run the test suite with the following npm script:
npm run test:unit
The output should be green, indicating that the test passed, as the following image depicts:

Installing testing library
Version 3 of VueJs requires installing a different package from VueJs 2 as the official documentation depicts. As in the previous step was used vue 3, the following command is needed to install the library:
npm install --save-dev @testing-library/vue
Once Installed, the library will allow us to convert the previous test case to something like the following:
it('renders properly', () => {
  const {getByText} = render(HelloWorld)
  expect(getByText('Hello Vitest')).toBeInTheDocument();
})
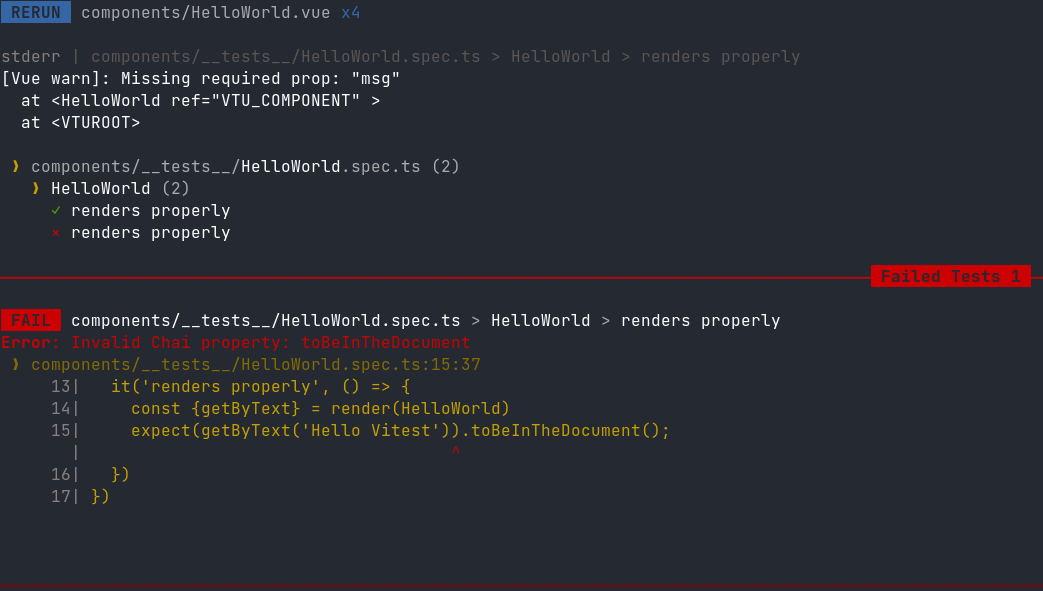
Doing so and trying to execute the test suite will lead to a different problem, now, Vitest complains that it cannot understand toBeInTheDocument, as the following image depicts:

Which makes sense. This is a matcher from Jest that Vitest does not support, fixing that was shown already by this blog post, which installs the jest-dom package and extends the Vitest matchers.
Error: Invalid Chai property: toBeInTheDocument
The next step to fix this issue is to install the package @testing-library/jest-dom that adds the matchers used by jest in our project, to accomplish that the following command should be executed:
npm install --save-dev @testing-library/jest-dom
Then, the matcher can be exposed to Vitest. Exposing the matchers to Vitest happens through extending the Vitest matchers, Markus recommended creating a file named setup.ts under the folder test, inside src, with the following content:
import matchers from '@testing-library/jest-dom/matchers';
import { expect } from 'vitest';

expect.extend(matchers);
With this file in place, the next step is to inform Vitest to use this file and load it up before the test run. Informing Vitest about the setup.ts file is as simple as adding it to the configuration file vite.config.ts.
import { fileURLToPath, URL } from 'node:url'

import { defineConfig } from 'vitest'
import vue from '@vitejs/plugin-vue'

// https://vitejs.dev/config/
export default defineConfig({
  plugins: [vue()],
  resolve: {
    alias: {
      '@': fileURLToPath(new URL('./src', import.meta.url))
    }
  },
  // ===============================================
  // ===============================================
  // Add the live above to the configuration, it will inform Vitest to use the file.
  test: {
    setupFiles: ['test/setup.ts']
  }
})
TS2345 ‘test’ does not exist in type ‘UserConfigExport’ - Issues with type script
You might also face an issue with types in typescript when trying to add the key test in the configuration, the error is similar to the following:
TS2345: Argument of type '{ plugins: Plugin_2[]; resolve: { alias: { '@': string; }; }; test: { setupFiles: string[]; }; }' is not assignable to parameter of type 'UserConfigExport'. Object literal may only specify known properties, and 'test' does not exist in type 'UserConfigExport'.
The fix is to replace the typed configuration from Vitest root to the one under vitest/config:
import { fileURLToPath, URL } from 'node:url'

import { defineConfig } from 'vitest/config' // <!------ This is the fix
import vue from '@vitejs/plugin-vue'

// https://vitejs.dev/config/
export default defineConfig({
  plugins: [vue()],
  resolve: {
    alias: {
      '@': fileURLToPath(new URL('./src', import.meta.url))
    }
  },
  // ===============================================
  // ===============================================
  // Add the live above to the configuration, it will inform Vitest to use the file.
  test: {
    setupFiles: ['test/setup.ts']
  }
})
With that in place, the test should be back to green again, and the configuration, from the execution point of view, is done.
TS2339: Property ‘toBeInTheDocument’ does not exist on type ‘Assertion ‘ - Fixing assertions type
The last bit of this configuration left is to share the types that Jest has to use with testing-library, this is needed because, at this point, the project should be giving the following error when trying to build with npm run build or opening it in an IDE or text editor.
The following image depicts the error when trying to build:

Fortunately, the trick to fix this issue is adding the types that jest also uses.
To start fixing this, run the following command in the terminal:
npm i --save-dev @types/testing-library__jest-dom
With the types installed, the next step is to share them with Vitest. The file that is responsible for that is in the root of the project and is named tsconfig.vitest.json, opening the file, should give the following content:
{
  "extends": "./tsconfig.app.json",
  "exclude": [],
  "compilerOptions": {
    "composite": true,
    "lib": [],
    "types": ["node", "jsdom"]
  }
}
The key that we are interested in is the last one, under compileOptions named types. The property “types” is the place where we can give Vitest a hint of the types we are using. The step missing is the one to add the type @types/testing-library__jest-dom there. In the end, the file tsconfig.vitest.json should be as the following:
{
  "extends": "./tsconfig.app.json",
  "exclude": [],
  "compilerOptions": {
    "composite": true,
    "lib": [],
    "types": ["node", "jsdom", "@types/testing-library__jest-dom"] // <------ we added this last type
  }
}
Running the command npm run build again should give the desired output, building the application without problems. The following image depicts the successful run of the build command.

Conclusion
In conclusion, combining Vitest and testing-library can provide a powerful and efficient solution for testing. While there may be some challenges in configuring them to work together, this post has provided a step-by-step guide on how to overcome these issues. By using the testing-library, we can ensure that our tests are not coupled with production code, allowing for easier refactoring and improvement. By sharing the types that Jest uses with Vitest, we can ensure that our project builds without issues and runs smoothly. Overall, with the right configuration and setup, Vitest and testing-library can be a powerful combination for efficient and effective testing.