Table of contents
Setting up GPS NEO 6 sensor with Raspberry PI and Node.js
The content here is under the Attribution 4.0 International (CC BY 4.0) license
Join Our Community
Connect with developers, architects, and tech leads who share your passion for quality software development. Discuss TDD, architecture, software engineering, and more.
→ Join SlackRecently I have had the chance to set up a basic IoT project that consists of localization by GPS. The decision was to work with the Raspberry board over the Arduino based on the number of shields that Arduino would use.
We would need a Wi-Fi(or GSM) shield, which on Raspberry is just an adapter. The second point was the MQTT protocol and the code maintainability. Whereas Arduino is just plain C, with Raspberry we have more options. One could argue that we can use the standard firmata to avoid using C, but just for clarity, this wasn’t the crucial point. After deciding which board to use the time was to gather the GPS. As you might have guessed the GPS NEO 6 was the chosen one (most of NEO6 comes with an external antenna, but here I used one with an internal antenna). In this post you will see the following:
- Wiring up the components
- How to configure the Raspberry Pi and read data from the GPS
- Enable the UART mode in a specific GPIO
- Gotchas, a few tricks and tips to help you mitigate problems
IMPORTANT - EDIT 05/01
The antenna that comes with this sensor is cheap and takes time to receive the signal from the satellites. Make sure to be outside, and with a clear vision from the sky to improve your success of getting a signal.
The sensor has a PPS indicator (green light), when blinking it indicates that the signal is coming and therefore you are receiving the correct information. Otherwise, the light will keep on, which means that it is trying to connect.
Wiring up
IMPORTANT: Before we start, the version of Raspberry Pi that I used is the model 2 B+, but it should be really simple to adapt to any Pi version.
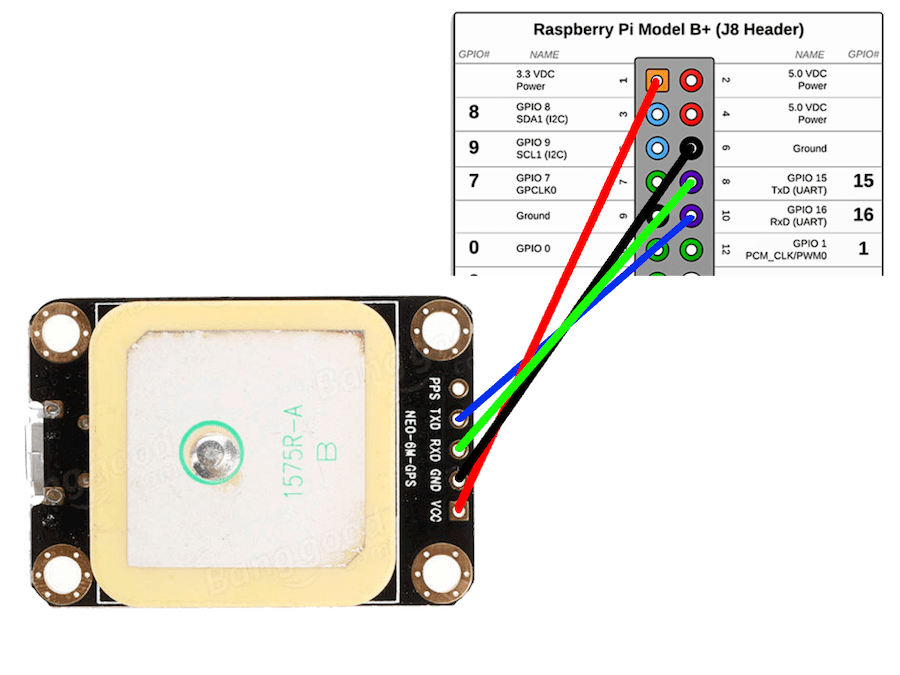
The first thing to keep in mind is the wiring, be careful while setting up the wires RX and TX. I just made a mistake that was plugin TX on TX and RX to RX. To avoid any further errors, the table below shows the pin name (from the GPS NEO 6) and where it should go on the Raspberry Pi.
| GPS NEO 6 | Raspberry Pi |
|---|---|
RX -> |
TX - GPIO 15 |
TX -> |
RX - GPIO 16 |
VCC -> |
3.3v or 5v |
GND -> |
GND |
The table below was built looking at the pi4j project, which has an image to better illustrate the pins. For now, the figure below should do the work.
If you follow everything as described in the table and the figure, you should see a green light on the GPS NEO 6. This means that at least the power was plugged correctly. The next step is to check the RX and TX connections which will send the data through the serial port. The first test doesn’t need any special software, we are going to connect using the cat command directly to the serial port.
IMPORTANT: Before testing the signal from the sensor is needed to convert the GPIO from IN to UART in order to do that we need the GPIO numbers that we connected our GPS, in our case it is 15 and 16.
Next just type the following command to switch the GPIO mode:
shell gpio mode 15 ALT0; gpio mode 16 ALT0Doing that will the work, but keep in mind that once you restart the Pi the default configuration will be restored. The ideal step here is to add this command into the
/etc/rc.local, so every time the Pi restarts it will run this command automatically.
Access your Raspberry Pi through SSH or plug in a keyboard and monitor to get to the shell. Once you are in, type the following command:
sudo cat /dev/serial0
If everything is correct you should see the following response:

Font: Waveshare.com
The serial port /dev/serial0 is an alias to the real one /dev/ttyAMA0. If for some reason your serial
port is not the same as this post, first find it and replace the serial with the correct one.
Finally, we have everything done to use the GPS daemon and client. If you have a look at the raw logs from the serial port, the text has a pattern but is difficult to understand and difficult to interact with (parse and use the data for an application). For that reason, the project GPSD exists, which is a library to help communicate with the GPS sensor ( not to mention the amazing interface between the sensor and the client).
To use it, just run the apt-get command as the following:
sudo apt-get install gpsd gpsd-clients
gpsd is the daemon that runs in the background to fill up the GPS client, without the daemon
is not possible to fetch the data that comes from the GPS. Even if you try to access the client
with the command cgps it will give you an error message.
pi@raspberrypi:~ $ cgps
cgps: no gpsd running or network error: -6, can't connect to host/port pair
cgps is the client that comes from the package gpsd-clients that we’ve installed.
To prevent the error we need to start the daemon passing as an argument the serial port to which our GPS is connected.
gpsd /dev/serial0
The command cgps should work as expected now. The picture below illustrates
the result after invoking the command.
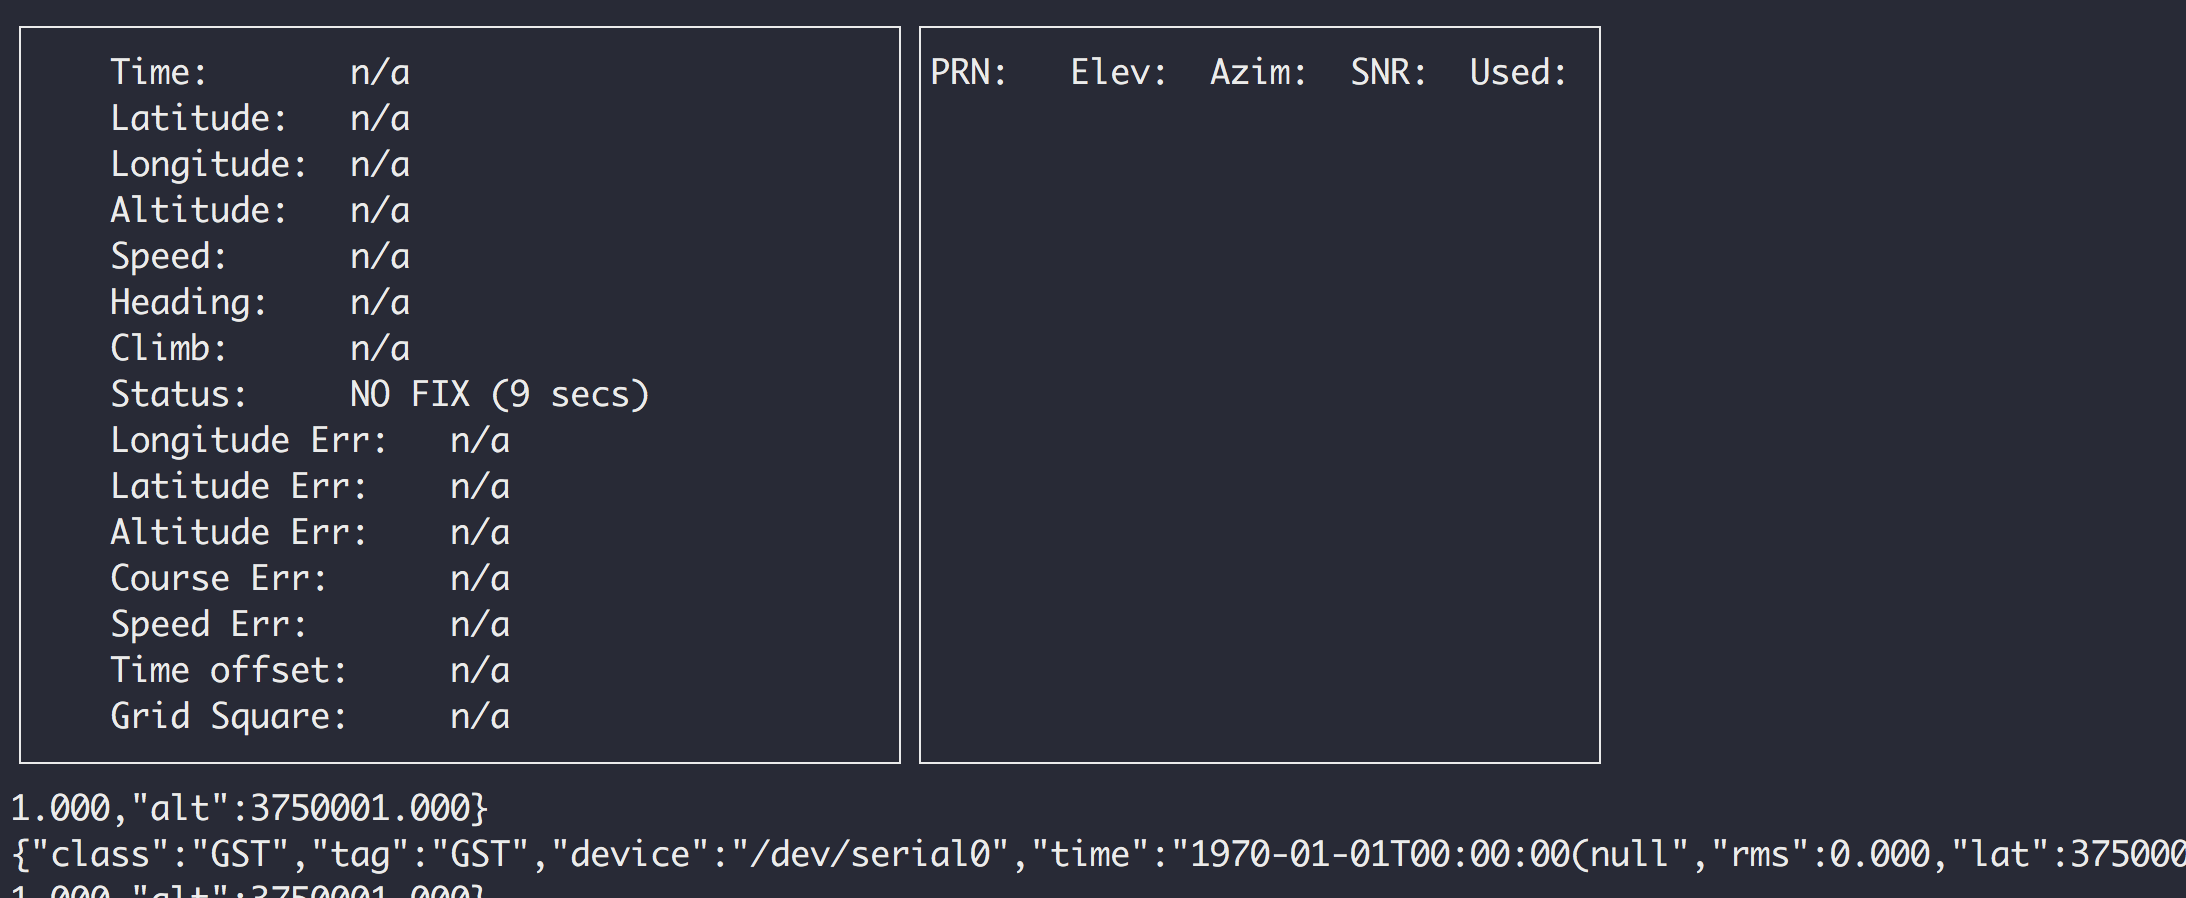
obs: The response given by the cgps is a JSON, to understand the content of each key
check out the official documentation.
Gotchas
In my experience, the GPS NEO 6 takes a long time to start receiving signals from the satellites across the earth. It takes from 30 minutes to 2 hours when it is supposed to be less than 1 minute. Keep in mind that it can happen to you as well but don’t worry, just wait and keep an eye on the logs.
References
Changelog
- May 01, 2024 - Grammar fixes