Table of contents
Gitconfig managing configuration for different repositories
The content here is under the Attribution 4.0 International (CC BY 4.0) license
Join Our Community
Connect with developers, architects, and tech leads who share your passion for quality software development. Discuss TDD, architecture, software engineering, and more.
→ Join SlackRecently, I had to manage different git repositories from different users, and I found myself needing to switch between different git configurations. This is a common scenario when working on multiple projects, especially in collaborative environments. Initially, I assumed a single global config was sufficient, but I soon discovered its limitations. Each repository had its own requirements (specially security, with signed commits and ssh keys), and I needed a way to manage these configurations without constantly changing the global settings.
Starting with git?
I have a dedicated section on this blog for git, where you can find more information about getting started with git, best practices, and advanced topics.
To that end, I discovered the power of local git configurations. Git allows you to set configurations at different levels: global, based on paths, and local. The global configuration applies across folders and repositories, the paths based applies on specific folders and the local configuration applies to a specific repository. By using local configurations, I could tailor settings like user name, email, and even SSH keys for each repository without affecting others, however, what happens when you have multiple repositories with different configurations? How do you manage SSH keys and GPG signing?
In this post, I’ll share what I learned about managing git configurations for different repositories, including how to set up local configurations, use SSH keys, and ensure that my commits are signed as I want them to be. This approach not only streamlined my workflow but also enhanced security and collaboration across different projects.
The approach I will be based on snippets and use cases that I have used in the past, be prepared to follow along with the examples, and feel free to adapt them to your own needs. In addition to that, the content generated here assumes *nix systems.
Git Configuration Hierarchy
Git offers different layers of configuration and each one of them follows a hierarchy. Global level configuration is the first level, folder is the second and the repository is the third. Configurations not defined in the repository defaults to the folder, if the folder is not defined with configuration it defaults to the global. Such hierarchy translates into the following structure:
~/.gitconfig/ # Global settings - this file is stored in your home directory (that's why it starts with `~`)
├── my-repo/
│   ├── .git
|   |    ├── .config # Local settings for this repository
│   └── src
|
├── another-repo/
│   ├── .git
|   |    ├── .config # Local settings for this repository
│   └── src
│   ├── pre-commit
│   └── post-receive
Defining configuration for each of those folders, will not affect one another, which means that you can have different user names, emails, SSH keys, and GPG keys for each repository. In addition to that, you can check which configuration is being used by running the following command:
git config --list --show-origin
This command will display the configuration settings along with their origin, indicating whether they are global, local, or folder-specific. The output will look something like this:
file:/home/you/.gitconfig                      user.name=Your Name            # Global configuration
file:.git/config                               core.repositoryformatversion=0 # Local configuration for my-repo
file:.git/config                               core.filemode=true              # Local configuration for my-repo
file:.git/config                               core.bare=false                # Local configuration for my-repo
file:.git/config                               core.logallrefupdates=true     # Local configuration for my-repo
file:.git/config                               core.ignorecase=true           # Local configuration for my-repo
Whenever getting lost on the configuration, this command will shed light on the place where the configuration is being defined, and which configuration is being used.
Note on the interaction between global, folder, and local configurations
The depicted approach is a simplified view of how Git configurations work. I am not sure if that’s how it is implemented, but it is how I understand it.
Let’s work together to set up a local git configuration for a repository, and put what we have seen in practice. This will allow us to manage settings like user name, email, and SSH keys specific to that repository, this is the most common use case.
Repository-specific Configuration - guided follow along
If you don’t have a repository yet, create one:
mkdir my-repo
cd my-repo
git init
You can set local configurations using the git config command. For example, to set your
user name and email for this repository, run:
git config user.name "Your Name"
git config user.email "my@email.com"
Once this is done, verifying the configurations inside the repository can be done through the cli with git config user.name
or opening the file .git/config. At this point in time, we have a repository with local configurations set up.
Repository-specific Configuration - challenge
At this point, you should have a repository with local configurations set up. Now, let’s challenge ourselves to set up a different user name and email for another repository. Create a new repository, either by cloning an existing one or initializing a new one, and set a different user name and email for it. In the previous session, we used the name “another-repo” as an example, so you can use that name or any other you prefer.
SSH Keys
SSH keys are a secure way to authenticate with remote repositories without needing to enter your username and password every time. They consist of a public key, which is shared with the remote server, and a private key, which is kept secure on your local machine. When you attempt to connect to a remote repository, the server uses the public key to verify your identity, allowing you to push and pull changes without manual authentication.
Why SSH over HTTPS?
Favoring SSH over HTTPS for Git operations is a common practice due to its security and convenience. SSH keys provide a more secure authentication method compared to HTTPS, which relies on username and password. With SSH, you can set up a key pair (public and private keys) that allows you to authenticate without entering your credentials every time.
Generating SSH Keys
To use SSH keys with Git, you need to generate a key pair and add the public key to your remote repository hosting service
(GitHub, GitLab). This process typically involves running ssh-keygen:
ssh-keygen -t rsa -b 4096 -C "your@email.com"
This command generates a new SSH key pair. You will be asked to generate a password (if needed you can set it or skip it), once done, you should see something similar to:
Generating public/private rsa key pair.
Enter file in which to save the key (/home/you/.ssh/id_rsa): [Press Enter]
Enter passphrase (empty for no passphrase): [Type a passphrase]
Enter same passphrase again: [Type the same passphrase]
Your identification has been saved in /home/you/.ssh/id_rsa.
Your public key has been saved in /home/you/.ssh/id_rsa.pub.
The key fingerprint is:
SHA256:XXXXXXXXXXXXXXXXXXXXXXXXXXXXXXXXXXXXXXXX
Side note on the naming of the SSH key files
Usually, the SSH key files are named id_rsa for the private key and id_rsa.pub for the public key. However, you can
choose a different name if you prefer. In addition to that, I was often struggling with the correct pattern to use when
changing the name. When prompted with the file name, use the full path plus the ssh key you want to, writing the file name
will save the key pair in the directory that the command is being issued. Let’s go through an example, assuming we are
at /projects/your-repo directory:
ssh-keygen -t rsa -b 4096 -C "a@a.com"
When prompted for the file name, you should specify a different name like this (note the full path):
Enter file in which to save the key (/home/you/.ssh/id_rsa): /home/you/.ssh/id_rsa_github
The file will be saved as /home/you/.ssh/id_rsa_github and the public key will be saved as /home/you/.ssh/id_rsa_github.pub.
Whereas, if you issue the command without the full path, when prompted for the file name, like this:
Enter file in which to save the key (/home/you/.ssh/id_rsa): id_rsa_github
The file will be saved as /projects/your-repo/id_rsa_github and the public key will be saved as /projects/your-repo/id_rsa_github.pub.
Although this is not a problem, it is not the best practice to save SSH keys inside a repository, as they are sensitive
information and should be kept secure. It is recommended to save them in the ~/.ssh under the file
permissions 600 or 644.
At this point, you have generated a new SSH key pair. The private key is stored in ~/.ssh/id_rsa and the public key
is stored in ~/.ssh/id_rsa.pub. The private key should be kept secure and not shared with anyone, while the public key
can be shared with remote repositories to authenticate you.
Adding the Public Key to Your Remote Repository Hosting Service
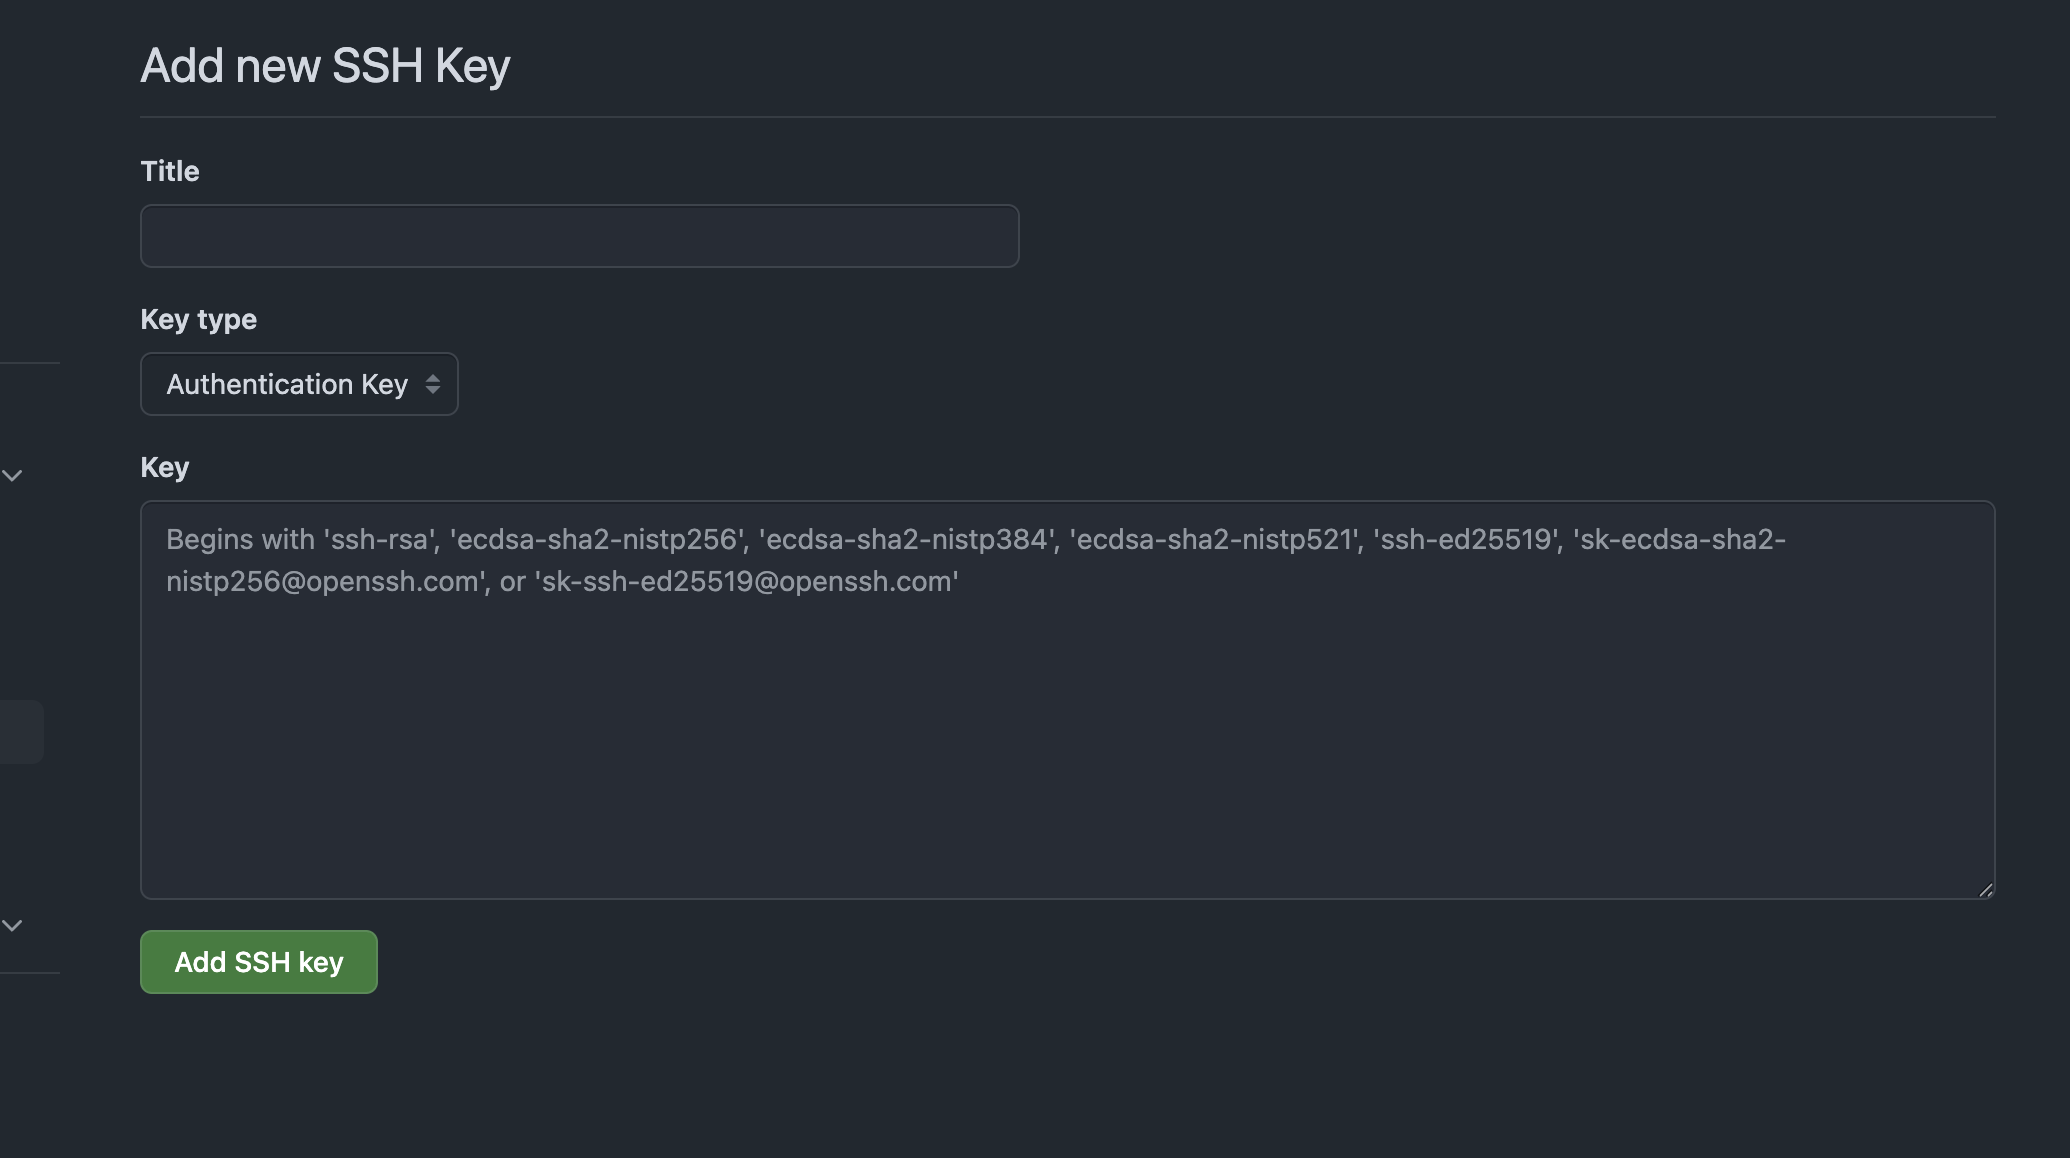
With your SSH key pair, you need to add the public key to your remote repository hosting service. For example, on GitHub, you can do this by going to your account settings, navigating to “SSH and GPG keys”, and clicking “New SSH key.” Paste the contents of your public key file into the provided field and give it a descriptive title.
Once the public key is added, make sure to enable authentication with the key (if under an organizarion), with that set, you can test the connection by running:
ssh -T git@github.com
You should see a message like:
Hi <username>! You've successfully authenticated, but GitHub does not provide shell access.
This confirms that your SSH key is correctly set up and you can now use it to authenticate with your remote repositories. If you see a message like “Permission denied (publickey),” it means that your SSH key is not correctly set up or not added to your remote repository hosting service. Double-check that you have copied the public key correctly and that it is added to your account, or use the following command to debug the ssh connection:
ssh -vT git@github.com
It will display the connecton information and they ssh keys being used, and useful information to debug the connection. When I was faced with this issue, I found that the SSH key was not being used because it was not added to the SSH agent.
A side note on multiple SSH keys
If you have multiple SSH keys for different repositories, you can specify which key to use by creating or modifying the
~/.ssh/config file. Here is an example configuration:
Host github.com
    HostName github.com
    User git
    IdentityFile ~/.ssh/id_rsa_github   # Path to your specific SSH key for github, this name should match the key you generated
However, this will affect the authentication for all repositories hosted on GitHub, because it is host based configuration.
That’s why I prefer to use the sshCommand configuration in Git, which allows you to specify the SSH key for a specific repository
without affecting others. An alternative is to use the includeIf to set the SSH key for a specific repository.
Using SSH keys with Git
Once the public key is added to your remote repository hosting service, you can configure Git to use this key for authentication. This is automatically done if you use the default ssh key pair name (id_rsa) and cloned a repository via SSH, rather than HTTPS. However, using a different name for the pair keys or working on multiple repositories that requires different keys need an extra configuration to be done. Let’s split them into two: to clone a repository and to make operations in the repository. Why? Because usually, the ssh key is done before cloning a repository.
Cloning a repository
When cloning a repository, you can specify the SSH key to use by using the command
line option -c with the sshCommand configuration. For example, to clone a repository using a specific SSH key, you can run:
git -c core.sshCommand="ssh -i ~/.ssh/id_rsa_github -F /dev/null" clone git@github.com:enterprise/webapp.git
This command tells Git to use the specified SSH key (~/.ssh/id_rsa_github) for authentication when cloning the repository.
Operations in the repository
Using different ssh pair keys is accomplished by adding the following lines to your local Git configuration file (.git/config):
[core]
    sshCommand = "ssh -i ~/.ssh/id_rsa_github -F /dev/null"
This tells Git to use the specified SSH key (~/.ssh/id_rsa_github) for authentication when connecting to remote repositories.
This configuration is specific to the repository, so you can have different SSH keys for different repositories without
affecting the global settings. Any command you issue will take into account this key (git pull, git push etc). The opposite
is also true, if you want to use the global SSH key, you can adding this line to your global Git configuration file
(~/.gitconfig) and it will apply to all repositories.
SSH key specific to a repository - challenge
Now that you have set up SSH keys for your repositories, let’s challenge ourselves to create a new repository with a different
SSH key pair. Generate a new SSH key pair using the ssh-keygen command, as shown earlier, and add the public key to your
remote repository hosting service. Then, configure git to use this SSH key by using the command line to clone
the reository and adding the sshCommand line to the ~/.git/config file.
GPG
GPG (GNU Privacy Guard) is a tool for secure communication and data storage. It allows you to sign your commits, ensuring that they are authentic and have not been tampered with. This is particularly important in collaborative environments where multiple contributors are working on the same codebase. Signing commits with GPG adds an extra layer of security and trust to your work, making it easier for others to verify the integrity of your contributions.
GPG + GitHub
GPG is an independent tool that can be used with various platforms, including GitHub, GitLab, BitBucket, and others.
GitHub (and other platforms like GitLab or BitBucket) supports GPG-signed commits, allowing you to verify the authenticity of commits made by contributors. The process of signing commits with GPG involves generating a GPG key pair, configuring Git to use that key, and then signing your commits with the key. This ensures that your commits are not only attributed to you but also verifiable by others. GitHub makes it easy to see the signature status of commits, providing a clear indication of whether a commit is signed and verified through the history of the repository:
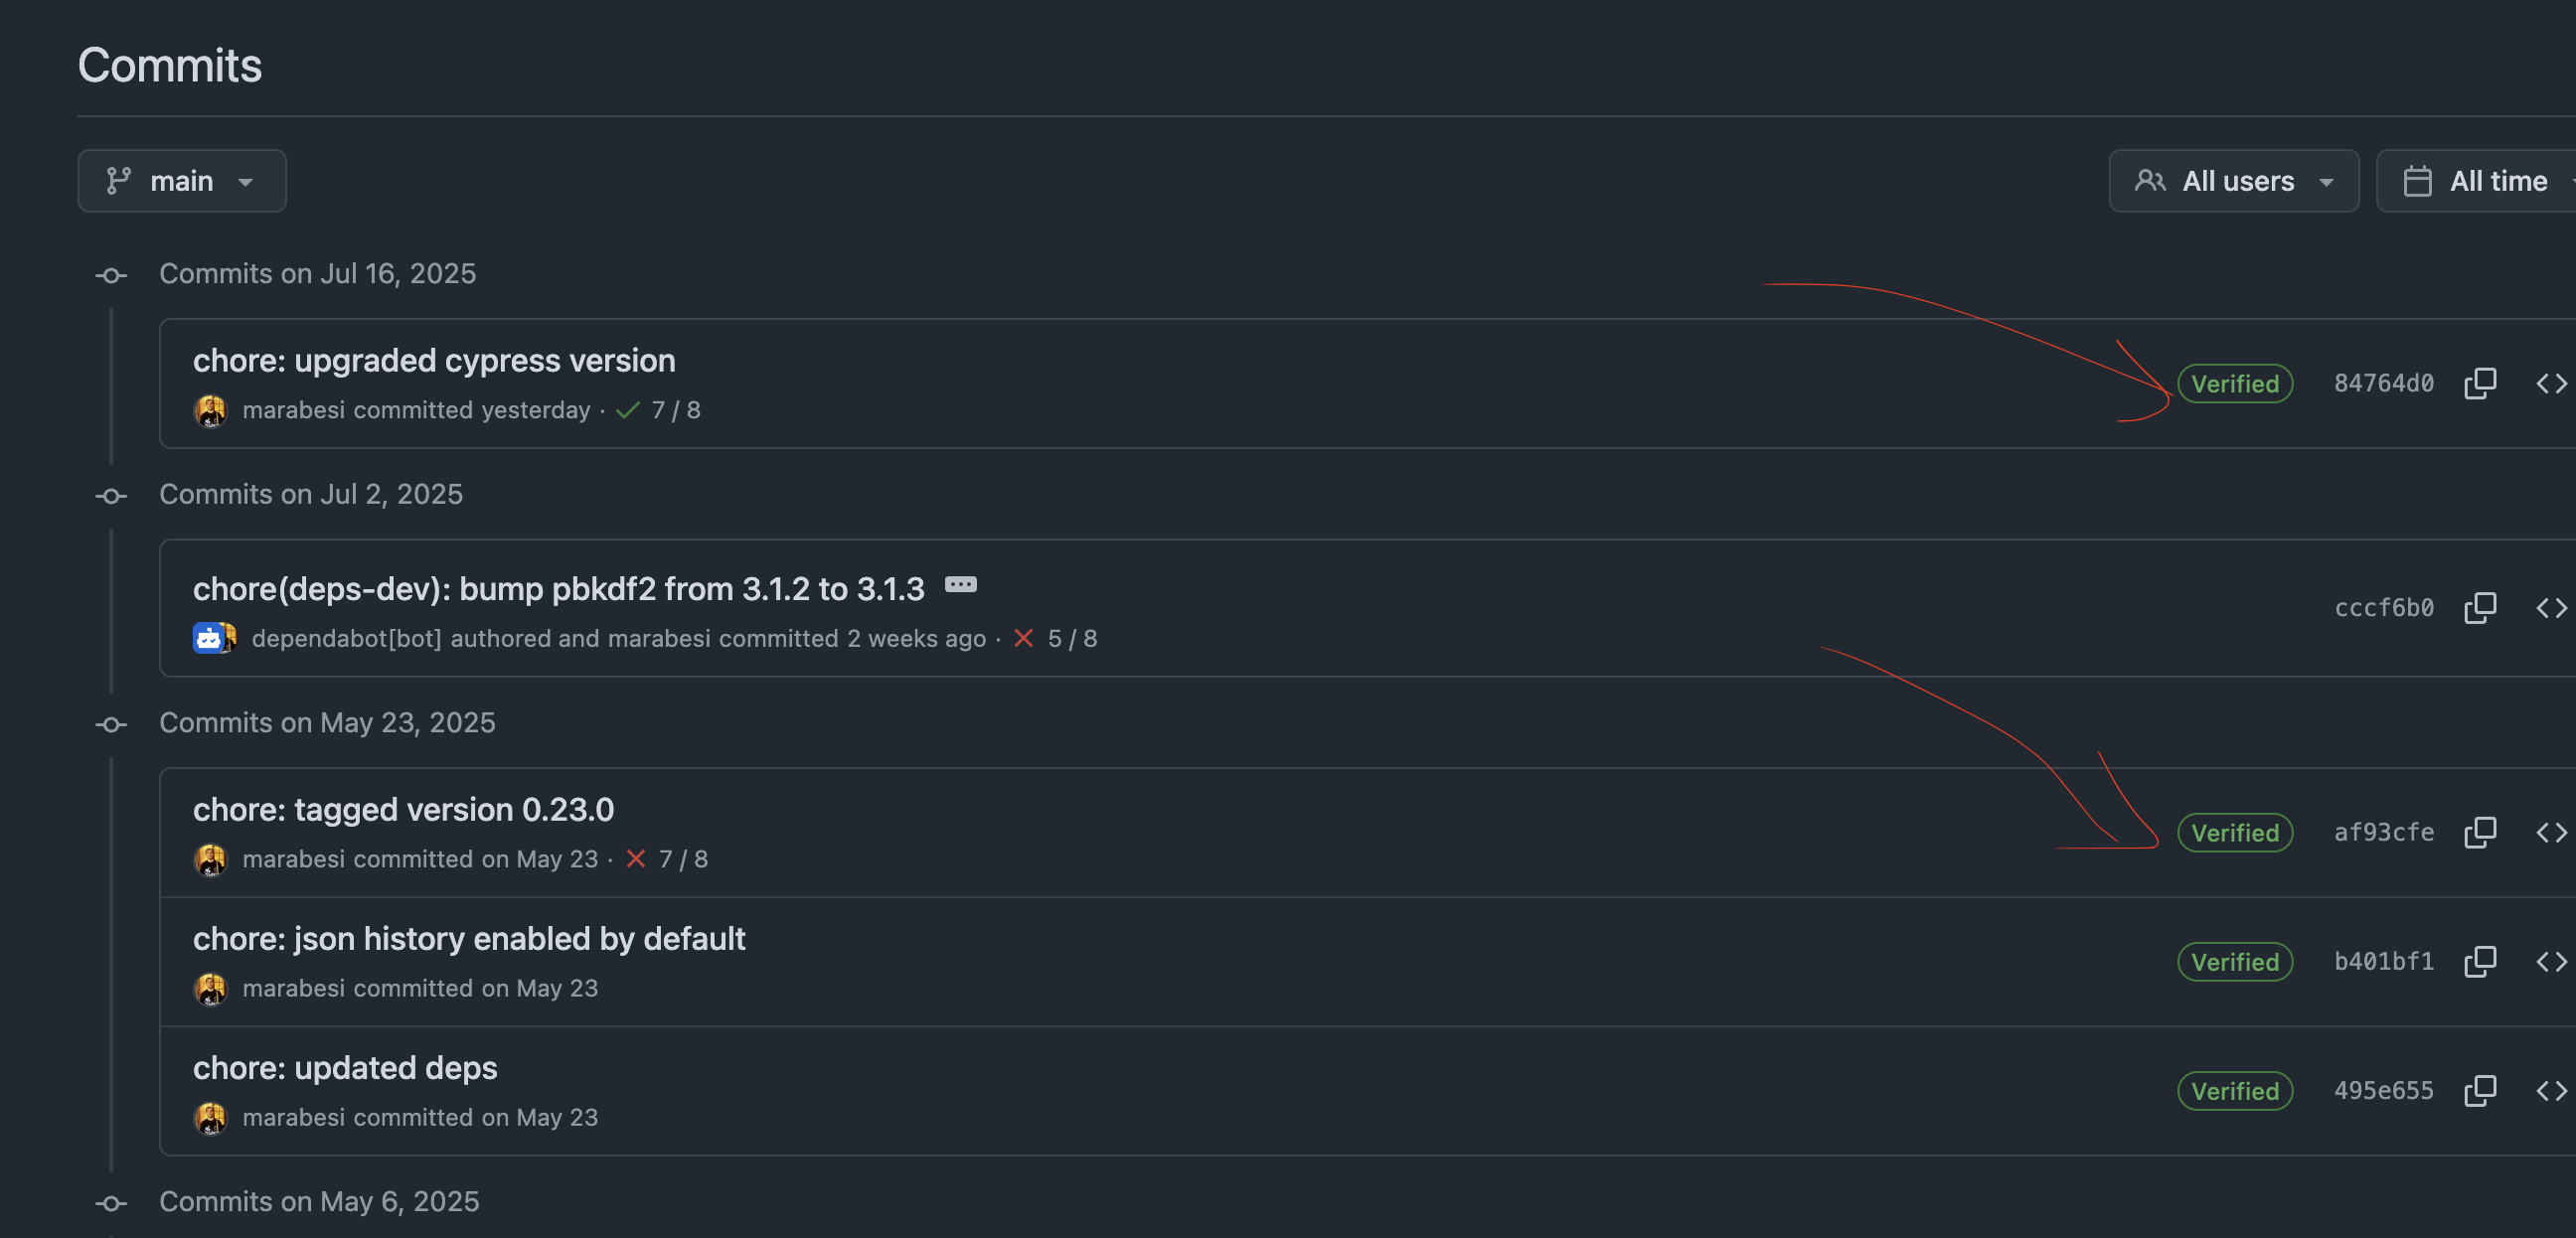
Other platforms also make a similar effort to show the signature status of commits, ensuring that contributors can easily verify the authenticity of commits made by others.
Generating GPG keys
First, the GPG key needs to be generated in order to use it with git. Run the following command to get start with the generation, when asked for key type, you can choose the default (RSA and RSA) or any other type you prefer. You can also choose the key size, 4096 is recommended for better security:
gpg --full-generate-key
You will be prompted to enter your name and email address, which should match the ones you use in your Git configuration. Once the key is generated, you can list your GPG keys with:
gpg --list-secret-keys --keyid-format LONG
You should see output similar to this:
sec   4096R/<key-id> 2025-07-17 [SC]
uid                          Your Name <your@email.com>
ssb   4096R/<subkey-id> 2025-07-17
They key-id is the long alphanumeric string (e.g., A1B2C3D4E5F6) that uniquely identifies your GPG key. This is the key
you will use to sign your commits. Note that, as the SSH pair keys, you can have multiple GPG keys, each with its own key-id.
Add the Key to Your Gitconfig
To use your GPG key with Git, you need to configure Git to use the key for signing commits. You can do this by adding the
following lines to your global Git configuration file (~/.git/config) to set the GPG program and enable commit signing by
default (whenever you see <key-id>, replace it with your fingerprint):
[gpg]
    program = gpg

[user]
    gpgSign = true   # Preferred method for sign-off (less verbose than `git config commit.gpgsign`)
    signingKey = <key-id>  # E.g., A1B2C3D4E5F6

[commit]
    gpgsign = true   # Sign all commits by default
In the next sections, we will explore how to sign commits with GPG and verify the signature status of commits in your repository.
Committing
At this point, you can start signing your commits with GPG. When you make a commit, Git will automatically sign it using
the GPG key you configured. You can also sign a commit manually by using the -S option with the git commit command:
git commit -S -m "Your commit message"
Or, implicitly by using the git commit command:
git commit -m "Your commit message"
As we have set the gpgSign option to true, Git will automatically sign the commit using the GPG key specified in the
signingKey option, there is no need to use the -S option in this case.
Test Your GPG key
In the past I used to create a commit and push to see it reflecting in GitHub (or other providers you might be using), however, there is an easier way to check that with git. Use the following commit on a repository:
git log --show-signature
This command will display the commit history along with the GPG signature status. If your commits are signed correctly, you should see a message indicating that the commit is signed and verified. If not, you may need to check your GPG configuration or ensure that the key is correctly associated with your Git user settings. The output should look like this, for correct configuration:
commit <commit-id>
gpg: Signature made <date> using RSA key ID <key-id>
gpg: Good signature from "Your Name <>"
and the following for a commit that is not signed:
commit <commit-id>
gpg: Signature made <date> using RSA key ID <key-id>
gpg: Can't check signature: No public key
If you see a message like “gpg: Can’t check signature: No public key,” it means that your GPG key is not correctly set up or not added to your Git configuration. Double-check that you have copied the key ID correctly and that it is added to your Git configuration.
Creating a specific GPG key for a repository - challenge
Now that you have set up GPG signing for your commits, let’s challenge ourselves to create a new repository with a different
GPG key pair. Generate a new GPG key pair using the gpg --full-generate-key command, as shown earlier, and add the key ID to your
Git configuration, this time, use a different repository. In the end, you should have two repositories, each with its own
GPG key pair, and you should be able to sign commits in both repositories using the respective GPG keys.
Include If
Another useful feature of Git is the includeIf directive, which allows you to include configuration files based on
specific conditions, such as the path of the repository. This is particularly useful when you want to
apply different configurations for different repositories. For example, you can create a global configuration file
(~/.gitconfig) and include repository-specific configurations based on the path of the repository.
Let’s see how to do that.
Using includeIf
You can use the includeIf directive in your global Git configuration file (~/.gitconfig) to include
repository-specific configurations based on the path of the repository (SCM, 2025). This allows you to have different configurations
for different repositories without having to manually switch between them. Here is an example of how to use
includeIf in your global Git configuration file:
[includeIf "gitdir:/projects/my-repo/"]
    path = /projects/my-repo/.gitconfig

[includeIf "gitdir:/projects/another-repo/"]
    path = /projects/another-repo/.gitconfig
This configuration tells Git to include the configuration file ~/projects/my-repo/.gitconfig for any repository
under the path ~/projects/my-repo/ and the configuration file ~/projects/another-repo/.gitconfig for any repository
under the path ~/projects/another-repo/.
A key difference between using includeIf and the local configuration is that the local configuration is specific to a
repository and is stored in the .git/config file of that repository, while includeIf allows you to include
configuration files based on the path of the repository, which can be useful when you have multiple repositories. In addition
to that, with this approach you can pick the place where your configuration files are stored, which can be useful
if you want to keep your configurations organized in a specific directory to share them across different machines or
repositories.
Final considerations
Managing git configurations for different repositories is a powerful way to tailor your workflow and enhance security. By using local configurations, SSH keys, and GPG signing, you can ensure that your commits are attributed to the correct user and are verifiable by others. This approach not only streamlines your workflow but also enhances collaboration across different projects.
For smaller projects, for low-security requirements, or for personal projects, you can use the global configuration to set your user name, email, and SSH keys. However, for larger projects or when working with multiple repositories, it is recommended to use local configurations to ensure that each repository has its own settings. This allows you to manage your workflow more effectively and ensures that your contributions are properly attributed and verifiable. For enterprise environments, it is common to use SSH keys and GPG signing to ensure that commits are secure.
Resources
References
- SCM, G. (2025). git-config Documentation: Includes. https://git-scm.com/docs/git-config#_includes
About this post
This post content s was assisted by AI, which helped with research, curate content and code suggestions.