Laration - A simple way to visualize your configs
Sometimes during our development work, we need to check whether a config has been defined, and most of the time, we just jump to the file, which means seeking the file, opening it, and changing it (or just seeing the value and leaving it as it was).
Laravel provides us with a really simple way to find the configs. This is because Laravel uses the dot file pattern, where the configuration needed will be inside an .env file in the root of the project.
APP_ENV=local
APP_KEY=base64:IYCeNxLZFcUKLn6IoeCzKFiW0WmVjt6gU36kCBOfr9A=
APP_DEBUG=true
APP_LOG_LEVEL=debug
APP_URL=http://localhost

DB_CONNECTION=mysql
DB_HOST=127.0.0.1
DB_PORT=3306
DB_DATABASE=homestead
DB_USERNAME=homestead
DB_PASSWORD=secret
This solution is the basic one, and there is nothing wrong with it. Let’s review the needed steps to get where we want:
- Go to the root of your project.
- Find the variable that you want.
- Change it or just check it’s value.
Laravel also provides us with some defaults. When the Laravel engine doesn’t find the needed configuration, it will assume a default. The default values are defined inside the configs/ folder.
The first problem comes when we try to find each default value. To achieve that, we will need to first go to the .env file, and only if the value doesn’t exist, we will try to find it in the config folder. This approach is the most common, but as we probably noticed, we spend much time just trying to find what we need.
The approach above also reveals a new kind of problem: what if we would like to see all the environment variables at once? Unfortunately, this is not possible without programming something inside Laravel by creating a controller and exposing all the configs through the helper config().
- Go to the root of your project.
- Find the variable that you want.
- Go to the configs folder and find the default value.
- Change the default value or just check it.
The step number 3 will require more time if you don’t know in which file the variable that you want is. This behavior is a consequence of Laravel’s structure. For each section of configuration, you will have different files.

To solve the problems listed above, Laration was born: a simple Laravel package to list your configurations being used by your application.
Laration
Laration is a small package (actually has only one class) and can manage your environment variables really easily. The package can be found on github and is easily installed using composer.
Laration provides an interface in your command line to list the variables being used by your application, divided into sections. By this, you can simply see the variables from your cache, session, services, and many others in your terminal, right away, without looking for further files.
From now on, I’ll assume that you have composer installed on your machine. If you don’t, please follow this link and make sure you have composer globally installed.
Creating simple Laravel application
First of all, you need to have a Laravel application. If you already have one, skip to the next part of this post. Otherwise, keep reading and set up your first Laravel application.
Before moving on, let’s install the Laravel installer on composer with the following command:
composer global require "laravel/installer"
Two points to pay attention to: you do need to have composer already installed on your machine, and this command should be executed successfully. If any error occurs, please step back and fix it.
The next step here is to install the Laravel application, this is a matter to execute a second command in your terminal. The following command will create a new Laravel application inside a folder called laration_demo.
composer create-project --prefer-dist laravel/laravel laration_demo && cd laration_demo
The image below shows us that an application has been created successfully and is ready to use. Make sure to see the same result in your terminal, if not, something went wrong. In this case try to start from the beginning.

Now let’s serve our newest application using Laravel’s built-in server. To complete this task we are going to use Artisan.
php artisan serve
The command above will start a local web server and it will be available to access through the port 8000, to access it go in your prefered browser and type http://localhost:8000
The message Laravel development server started on http://localhost:8000 should be displayed, and you will have the same as in the figure below:

Finally we’ve got a Laravel application running, the next step will show how to install the Laration package and how to configure it.
Installing Laration
The Laration package will work only in a Laravel based application, to install it we need to change code inside the Laravel application and the first step is to add the dependency in the composer.json. Open the file composer.json and add the following dependency to it :
{
    "marabesi/laration": "dev-master"
}
In the end you’ll have something similar to the following image:

We are almost done, the last step is to update the dependencies. To do this go back to your terminal inside the laration_demo folder and execute the following:
composer update
The command will update all the dependencies inside your Laravel application, but as we just added one new dependency and no one has been changed you will see that composer just added the Laration package, as shown in the image below:

Finally we have both, the Laravel application and the Laration package. The last step to see Laration in action is to add the command inside the Laravel. To achieve this we are going to add a single line of code inside the file located in app/Console/Kernel.php
")
The Kernel.php file has an attribute called $commands, this attribute is where we must register all the commands available to be used in the application, there we are going to add the Laration command. By default it comes with and simple one line comment, as demonstrated in the code bellow:
<?php
/**
 * The Artisan commands provided by your application.
 *
 * @var array
 */
 protected $commands = [
     //
 ];
The change will be to remove the one comment line and add the code \Marabesi\Laration::class. The final code should be the same as the below:
<?php
/**
 * The Artisan commands provided by your application.
 *
 * @var array
 */
 protected $commands = [
     \Marabesi\Laration::class
 ];
Of course that you may have other commands available to you application, it really depends what you have already built. In this case just append the Laration command to the end of the $command attribute. Now you’ve successfully installed the Laravel framework within an application and the Laration package.
The last test will be on the command line. let’s invoke our friend Artisan and see if the Laration has been installed.
php artisan | grep laration
The command should return something like the image below.

The frase “List all environment variables used” confirm that the Laration has been installed. In the same result you will be allow to see all the commands available to use within Laration.
Playing around with Laration
The Laration package comes with a series of commands to list the environment variables. To get start with, we are going to see all the application variables. In order to do that we can easily invoke Laration to do this job for us.
php artisan laration:list app
All the variables used by the application will be shown, in this case the values should be different in the picture and yours, because the application that you have may be different. It will be the same result if you like me have installed a fresh copy of Laravel.
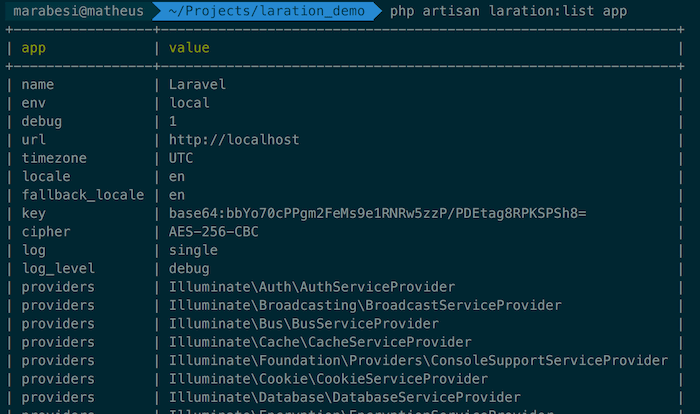
In the left side the keys are displayed and in the right side it’s value. If the key is an array it will keep repeating itself till the last element be reached, in the picture we can see the key providers as an example of it.
For each section of configuration Laration give us a different command, but the pattern still the same. The project on github is well documented, but just for simplicity I’m going to post here all the commands and its description.
| Configuration section | Laration command |
|---|---|
| app | php artisan laration:list app |
| broadcasting | php artisan laration:list broadcasting |
| cache | php artisan laration:list cache |
| database | php artisan laration:list database |
| filesystem | php artisan laration:list filesystem |
| php artisan laration:list mail | |
| queue | php artisan laration:list queue |
| session | php artisan laration:list session |
| view | php artisan laration:list view |
As you can see the pattern still the same, but the section changes, what turns Laration easy to use and to remember it’s commands. There is a deeper content when it comes to custom environments variables but it will be covered in other post in the future.
Laration came to help us in the daily bases when we are trying only to get a given value in the application environment. Laration allow us to spend the time in what is important and not trying to find where the variable needed is.
There is no way to change a given variable value by the time of this post, but of course it can change along the way.
About this post
This post was not assisted by AI. The content was created entirely by a human.