Table of contents
Mapping IR emitter module KY-005 sensor/receiver module KY-022-IR sensor - A tutorial for raspberry pi
The content here is under the Attribution 4.0 International (CC BY 4.0) license
For the past few days I have been playing with the kit ELEGOO 37-in-1 Kit and the first project I wanted to build was a remote control using Raspberry Pi and the sensor KY-022 that comes with the kit. Given the different sensors and boards, I took some time to figure out the steps I needed to build the project. This post is the detailed step-by-step that I did to build my project using IR sensors.
DISCLAIMER: This post is focused on the kernel 5.4, and the base hardware used is as follows:
- Raspberry Pi 3 Model B +
- Raspbian as an operational system
- The Energy supplied via a USB cable
DISCLAIMER 2: Sections 1 and 2 can be swapped out without any problem. If you prefer to set up the hardware part first, then read section 2 and then section 1. Therefore, if you prefer to set up the software first (as I prefer), you can keep the suggested order.
Setting up the pi to use IR
Note: the commands executed in this section are executed in the Raspberry Pi shell
There are two parts to this puzzle to make it work, the first is to install the lirc.
sudo apt-get install lirc -y
Next, we are going to configure the boot script to enable the IR package. (peppe8o, 2020)
has the steps to enable the pin to receive IR signal, and I will use the same
approach here. The changes in the file config.txt assume that
the receiver goes in the GPIO 17, ping 11. The transmitter goes in
the GPIO 18, pin 12 (pi, 2021).
sudo nano /boot/config.txt
dtoverlay=gpio-ir-tx,gpio_pin=18
dtoverlay=gpio-ir,gpio_pin=17
Once the change has been made in the file config.txt, save it and reboot
the pi. Once back in the pi shell, verify if the devices were enabled properly,
executing the following command:
sudo ls -l /dev/lirc*
The output should be something like the following:
pi@raspberrypi3:~ $ sudo ls -l /dev/lirc*
crw-rw---- 1 root video 251, 0 Jan 31 12:17 /dev/lirc0
crw-rw---- 1 root video 251, 1 Jan 31 12:17 /dev/lirc1
One interface for reading signals (/dev/lirc0) and the other to send it
(/dev/lirc1).
Wiring up
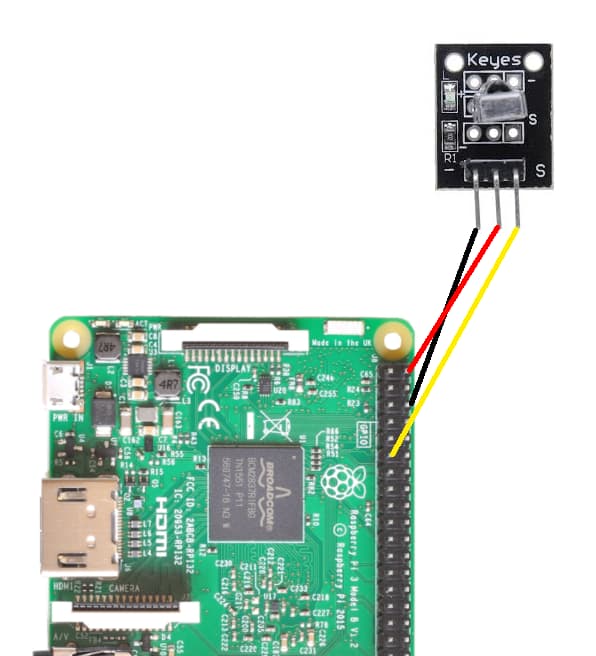
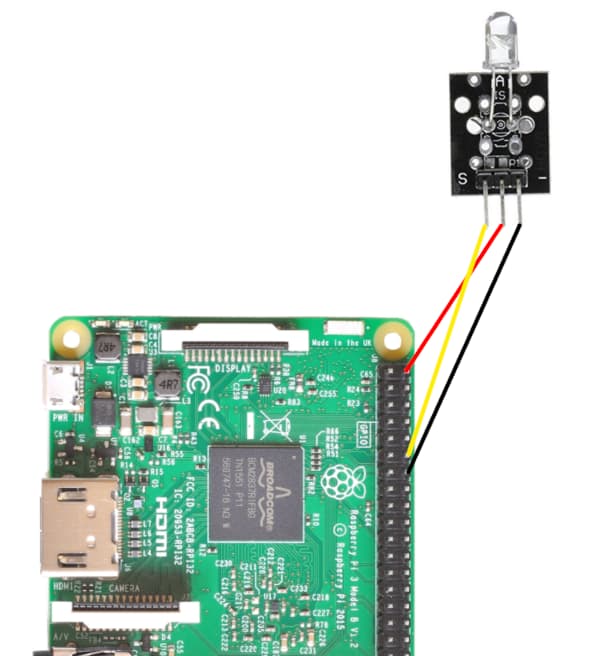
Wiring up the pi with both sensors was a bit of a challenge for me, first because it was a new sensor that I was working and it was difficult to find in a single website the wiring with both sensors and the pi. Often, the tutorials were for Arduino and for one sensor, the transmitter or the receiver (Pub, 2019). This section is the result of the lack of having both sensors on the pi. The first image depicts the wiring for the transmitter.

| Pi PIN | Transmitter PIN |
|---|---|
| 11 (GPIO 17) | YELLOW |
| 5v | RED |
| GND | BLACK |
The receiver sensor, was adopted from (epitran.it, 2021) as it has the wiring required but is used with Arduino.

| Pi PIN | Transmitter PIN |
|---|---|
| 11 (GPIO 17) | YELLOW |
| 5v | RED |
| GND | BLACK |
The following section will cover how to map the wiring presented in this section and send or receive the signals,
it will also dive into the remote control database that the project lirc has for already mapped remotes.
Mapping inputs to IR codes
Previous sections were focused on setting up the hardware and the needed software
to make the ir sensor work. This section focuses on the configuration of lirc.
The configuration presented here is needed to send ir commands.
The first step is to find out which remote you would like to configure. The lirc package provides the mapping between
the IR codes and the remote (alec_leamas, 2018). For
me, I ended up using the remote AA59-00600A. The following command depicts how to download a given remote configuration:
cd && \
wget https://sourceforge.net/p/lirc-remotes/code/ci/master/tree/remotes/samsung/AA59-00600A.lircd.conf && \
sudo mv AA59-00600A.lircd.conf /etc/lirc/lircd.conf.d/ && \
sudo /etc/init.d/lircd status
Once downloaded the irsend command is used to send IR commands to the television. For
the downloaded file above, the volume down IR command is as follows:
sudo irsend SEND_ONCE SAMSUNG_AA59-00600A KEY_VOLUMEDOWN
For each downloaded remote, I suggest opening the .lircd.conf file and checking the remote name and the available
keys under the section begin codes.
Miss leading configuration
A few tutorials related to the Pi will have an extra step regarding configuring the ir devices. The extra step says that
it is required to update the file modules under the directory etc. For this post and the setup I am using this step
is not required, there is no need to add an entry in the file located at /etc/modules.
References
- peppe8o. (2020). Setup Raspberry PI Infrared Remote from terminal. https://peppe8o.com/setup-raspberry-pi-infrared-remote-from-terminal
- pi, R. (2021). GPIO. https://www.raspberrypi.org/documentation/usage/gpio
- Pub, T. G. (2019). SENSOR WIKI: KY-005 INFRARED TRANSMITTER (IR). https://www.thegeekpub.com/wiki/sensor-wiki-ky-005-infrared-ir-transmitter
- epitran.it. (2021). KY-022 INFRARED RECEIVER MODULE. https://www.epitran.it/ebayDrive/datasheet/45.pdf
- alec_leamas, lirc. (2018). lirc-remotes - The lirc remotes database. https://sourceforge.net/p/lirc-remotes/code/ci/master/tree/remotes
Changelog
- May 01, 2024 - Grammar fixes